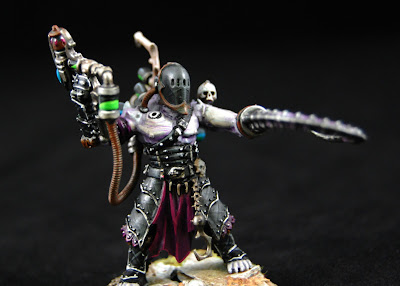
The idea of painting a vial to look like it's filled with fluid does seems like a scary thought… but it's just another painting obstacle that can be overcome with a little practice and a firm understanding of the principals that make it work well visually.
Initially when I set out to make a bunch of Dark Eldar Coven models I was scared to death about all the vials I would have to paint on Haemonculi, Pain Engines, Wracks, Grotesques, Scourges, etc. I developed a 4 step process that I would consider High-Quality Table Top.
Is it Golden Daemon? No, certainly not. But it does look great on the table and is realtively quick and effective process.
Step 1-2 : The Base Colors
This it the MOST CRUCIAL part of the whole process. You have to understand the process of how liquid moves in a glass vial and paint accordingly. Using the horizontal edge of the minis base as a guide, imagine how the bottom half of the vial will look once filled half way with fluid. It's crucial for each vial to have the top edge of the liquid parallel with the base edge. This will vary from vial to vial depending on how it's positioned on the model.
Step 3 : Fluid Highlight
All you do here is simply highlight the upper edge of the fluid line. The trick is to make the edge where the fluid meets the empty glass hard. The edge where the fluid highlight meets the darker fluid needs to be blended a bit. This makes it seem as if there's more depth to the bottom of the fluid filled areas.
Step 4 : Vial Highlight
The final step here is to paint the vial highlight. A simple thin line down the upper outside section will usually suffice. I prefer to use a light grey instead of white for this as to not overpower the effect of the vial painted underneath.
Optional Step 5
You don't need to do this, I usually don't. But you can paint bubbles into the fluid, by simply adding some tiny dots of a lightened up version of the base fluid color.


Great tutorial! I was wondering if you would mind if I posted about this in a few days so my readers would have access to this resource?
ReplyDeleteThanks Heretic!
DeleteYeah no problem on the repost. Just throw a link back to the blog :)
Eye Of Error: Painting Realistic Fluid Filled Vials In 4 Easy Steps >>>>> Download Now
Delete>>>>> Download Full
Eye Of Error: Painting Realistic Fluid Filled Vials In 4 Easy Steps >>>>> Download LINK
>>>>> Download Now
Eye Of Error: Painting Realistic Fluid Filled Vials In 4 Easy Steps >>>>> Download Full
>>>>> Download LINK ed
Looks great, thanks for the quick tut :)
ReplyDeleteGreat little tutorial, man! I usually go with white in the "empty" portion of the bottles, but I have to say I like the look of the black with the white specular light.
ReplyDeleteI'll have to try that out soon!
Looks better than how even GW does it.
ReplyDeleteI love it, simple but highly effective.
ReplyDeleteWell this is excellent.
ReplyDeleteThanks everyone! Glad you find the tut useful!
ReplyDeleteYou know, as great as the vials look, I think your wings are superb. Thanks for a great post!
ReplyDeleteExcellent work and happy year. Regards.
ReplyDeleteNicely illustrated. I'll be adding this to my tutorial list on the blog if you dont mind :)
ReplyDeleteYeah no problem. Thanks!
DeleteThis comment has been removed by the author.
ReplyDeleteThis is really a remarkable topic close to my heart thanks. Keep up the good working!
ReplyDeleteRenown Painters
This looks brilliant, bookmarked for when I paint my scourges :)
ReplyDeleteEye Of Error: Painting Realistic Fluid Filled Vials In 4 Easy Steps >>>>> Download Now
ReplyDelete>>>>> Download Full
Eye Of Error: Painting Realistic Fluid Filled Vials In 4 Easy Steps >>>>> Download LINK
>>>>> Download Now
Eye Of Error: Painting Realistic Fluid Filled Vials In 4 Easy Steps >>>>> Download Full
>>>>> Download LINK
Do My assignment
ReplyDeleteNeed help with your assignments? Our Do My Assignment for Me Australia Do My Assignment for Me Australiaservice offers expert academic assistance to students across Australia. Get high-quality, plagiarism-free assignments delivered on time by professional writers in various subjects. Whether it’s essays, research papers, case studies, or dissertations, we ensure top-notch work to help you achieve academic success.
ReplyDelete